Professional Drywall Repair in Aurora, CO

Gutters and Eaves

Gutters and Eaves

This is an excerpt from the Book called “Roofs & Siding” by Des Moines, Iowa.Continue reading to learn more about Gutters and Eaves , thanks to the author.

The area below a roof overhang-gutter and eave territory-is a common trouble spot. This chapter will guide you through repairs to fascia and soffits as well as show you how to repair and install gutters 

Water running of the roof should flow over the roofing, then over the drip-edge flashing and directly into gutters and down the downspouts. When everything is working the fascia and roof sheathing will stay relatively dry. However in an imperfect world, flashings may be poorly installed, roofing may fail, and gutters may overflow or leak. Any of these conditions can soak the fascia, the soffits, and perhaps the ends of rafters and roof sheathing as well. 

If you see signs of damage to your eaves, run a hose on the roof to check that the drip-edge flashing and gutters are installed correctly, so that water flows into the gutter and does not seep into the sheathing or fascia. While the water is running, watch the gutter a d downspouts for leaks and make needed repairers. Also check that the roofing is sound) and make any needed repairs or replacements. If ice dams form during the winter, they are likely the culprit take steps to ventilate the attic or otherwise protect against the dams.  

You will likely need to remove the gutters to repair or replace fascia and soffit boards. If the gutters are in less than excellent condition, this maybe the time to replace them if boards are only water-stain end or if rot is only in small spots, you may choose to apply wood hardener and epoxy filler. If the damage is deep or wide, replace all or part of the board. 

Whenever you remove a board, take time to check for further damage underneath it. If the area is wet, allow it to dry thoroughly before proceeding. If rafter ends are slightly rotted, you may be able to solve the problem by applying wood hardener. Otherwise it may be necessary to cut the ends short and perhaps to add reinforcing “sister” pieces alongside. Use pressure-treated lumber when replacing any wood pieces.

Gutter Guards
Gutter Guards

Fascia and Soffit Repairs 

Along the eaves you will often find fascia boards covering the ends of roof rafters as well as soffit boards (or sheets of plywood, aluminium, or vinyl) covering the underside of the eaves. A gutter usually is attached to the fascia (see for gutter repairs and installation). 

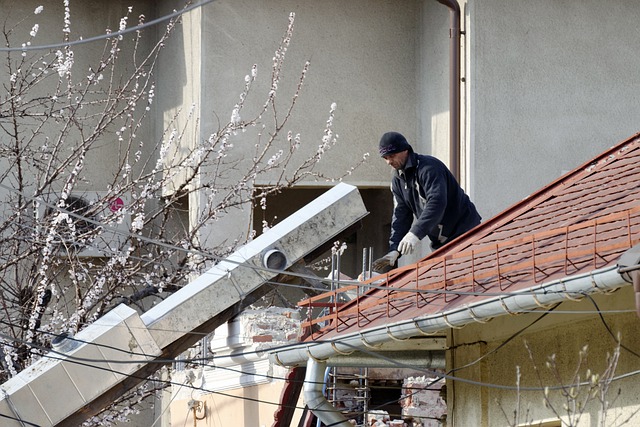
Fascia boards can get soaked with rainwater if the drip-edge flashing is damaged or incorrectly installed or if the roofing itself fails.  If this leads to rot, fascia boards need to be replaced. This does not call for special skills, but the work can be a bit messy. Be sure to work on a stable ladder or scaffolding and be careful not to lean too far to one side of the ladder while you work. 

Replace old boards with pressure-treated 1x lumber or plywood. It doesn’t cost much more than untreated wood and it will help prevent rot. 

Repairing fascia 

  1. Remove an entire board or cut alongside a rafter with a reciprocating saw to remove the damaged portion of a board. Pry the fascia away using a flat pry bar and a hammer. Take care not to dent the soffit or other boards while you pry. You likely will need to pry out the bottom first, and then pry the board down from the roof.  Pull out or pound in any exposed nails. 
  2. If the board meets another board in the center of a rafter, you can attach the new board in the same way. For greater strength cut a short 2×6 or 2×4 and install it alongside the rafter to provide more nailing surface. Attach with deck screws. 
  3.  Check for further rot and replace the drip edge if needed. Near the top of where the replacement board will go, attach a taut string to use as a guide for straightness. Cut a new fascia piece to fit.  Tap it up into position (if it is long have a helper hold the other end) and attach it to the rafter ends with nails or screws. 

You choose a scarf joint? 

A scarf joint is a good idea if the fascia is highly visible, and you may need to match an existing scarf joint. This is typically done by cutting the board at a 45-degree bevel, but 22 ½-degree bevels are also use. Cut a scrap piece to make sure the angle is right. Drill pilot holes before driving nails.

Dealing with rot in soffits, sheathing, and rafter ends 

If the roofing or flashing has failed, more than just the fascia may be damaged. The roof sheathing, soffit boards, and even rafters may have rotted as well. After removing the fascia poke all the exposed wood with a screwdriver; if the tip sinks in easily, the board is rotted. If the rot on a board is only half an inch or so deep, it’s usually okay to leave the board in place. Dry the area out and replace any other boards and flashings as needed to keep the area dry. If several rafter ends are rotted, you may need to uniformly trim 2 inches or so from them. Work carefully so they will all be the same length and angle. Or install “sister” 2xboards alongside the rafters and attach the fascia and soffit to the sisters. 

Soffit repairs 

  1. If a portion of a soffit is damaged, draw a straight line alongside the framing nail heads will likely show you where ranking members are) and cut with a reciprocating saw or hand keyhole saw. Remove the entire board (which wills no longer than 8 feet if it is plywood). 
  2. Pry out any molding covering the edges of the soffit board. Use a flat pry bar, then your hands, to pull out the damaged board. Inspect the exposed boards for further rot. 
  3. Use the old piece as a template for cutting a new piece. You may choose to add soffit vents at this time. Attach the new soffit piece with screws or nails and replace any moldings. 
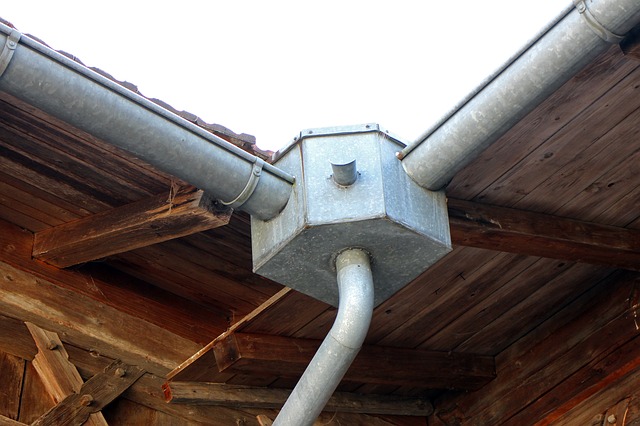
Gutter Repairs 

For a gutter system to efficiently f carry water away, it must be free of holes or loose joints, sloped at all points toward the downspouts, and clear of debris (usually leaves) that can slow the flow and clog downspouts.  

Regularly clean out your gutters using a small trowel, a special plastic gutter cleaning tool, or a gloved hand. Cut back branches that drop leaves and twigs onto the roof. Install gutter guards.

When inspecting gutter up close, check for rotted fascia boards or sheathing and make repairs. Also make sure the drip-edge flashing is properly installed, so rain flows into the gutter and not onto the fascia or the edge of the sheathing. 

Vinyl gutters are reliable, though the joints may come loose. Galvanized steel gutters will rust in time and need to be patched or have sections replaced. Aluminium gutters are rustproof but easily dented.  

A gutter may be attached using brackets, spikes, or a strap. Each type can loosen, especially if the fascia rots. All attachment parts can be easily replaced.  

Work on a stable ladder or scaffolding and avoid leaning far over while working. 

Unclogging Downspouts 

If water runs sluggishly or not at all through a downspout, try flushing it with a garden hose. If you need more pressure, seal the gap around the hose with a tightly stuffed rag. 

If a hose doesn’t do the trick, try running a plumbing auger—either a hand-crank model or a power auger—down the downspout. The auger may push the obstruction through or it may pull debris back out. As a last resort dismantle the downspout and clear out the sections individually. 

Stanley Pro Tip: Gutter Guards  

Several manufacture offer gutter covers often claiming that their product is the only one that really works. There are two basic options. A screen guard (above) keeps out all large debris; some models are smooth ad sloped so the leaves can slide over the gutter. A solid cover (above right) has an opening at the front that allows only flowing water into the gutter. Whichever type you chose test by directing a hose onto the roof to be sure the water will flow into the gutter and not slip behind, where it can damage sheathing or fascia. 

Patching A Hole 

  1. For a sturdy repair cut a piece of metal flashing several inches wider and longer than the hole. Use a putty knife to bend it so it conforms to the shape of the gutter.
  2. Spread a generous coat of roofing cement onto the inside of the gutter and press the sheet metal into the cement. Cover the metal with more cement and feather the edges so that water can flow easily over it.

What If… 

You use a patch kit?  

Self-stick patching material is quick to apply but may not be a permanent solution. Brush the area free of dust and debris, then follow the manufacturer’s application instructions. 

Sealing Joints And Caps  

If the gutter drips at a downspout or joint, you may be able to simply seal the leak with gutter caulk. First check that the joint is firm and drive screws or rivets if needed. Apply a generous bead of caulk, then smooth the caulk with a wood shim or a balled-up, mineral spirit-dampened rag. 

Gutter Repairs
Gutter Repairs
Installing Gutters 
Installing Gutters 

If an end cap has come loose, remove any screws and pull off the cap. Replace the cap if it is not in sound condition. Apply caulk to the inside grooves and press it back into place. 

Drive screws or pop rivets if called for. Caulk the inside of the endcap as well. 

Sealing Downspouts 

  1. If a downspout joint leaks, check to be sure the male (smaller) end of the upper piece is slid into the female (larger) end of the lower piece. To dismantle the parts remove any screws or drill out pop rivets. You’ll probably need to remove a wall bracket as well.  Pull apart the pieces. 
  2. If a part is badly bent or otherwise damaged, replace it. If it is basically in good shape, clean off any old caulk and grime with a wire brush. 
  3. Apply a generous bead of caulk to the male portion of the upper piece.  Slip the other piece over the caulk and drive screws or pop rivets to firmly attach the joint.  Add a touch of caulk to the outside of the joint. 

Fixing the slope 

A gutter should be sloped at a rate of 1/18 inch per foot or ½ inch over an 8-foot span. Test by directing a hose into the gutter and watching the water or use a level. 

If the gutter is supported by straps, install new straps as needed. Slip the strap onto the gutter and raise the gutter to the correct position. Drive screws to attach the strap. 

If a spike-and-ferrule system is used, position a ferrule (sleeve) at a rafter (don’t just attach to the fascia) and drill a hole in the front of the gutter. Drive a spike or long deck screw through the ferrule and into the fascia and rafter end. 

Replacing a section 

  1. If a gutter is installed in 8-or 10-foot sections, it is usually best to unfasten be screws or drill out the pop rivets and remove an entire section. If the gutter is seamless, cut out the damaged section using hacksaw. Place a scrap board in the gutter is shown to keep from bending the gutter as cut. 
  2. Depending on the gutter type, you may slip the replacement piece inside it—in which case you should cut the replacement several inches longer than the opening. Or the piece can attach using a coupling, in which case you will need to shorten it. Use a wood scrap to hold the replacement piece firm while you cut it to length. 
  3. If one piece will fit inside another (as shown), be sure that the water will flow first over the inside piece and then down onto the outside piece. Use a putty knife or rasp to file away any burrs that would prevent a tight fit. Set the replacement in a generous bead of gutter caulk and drive screws or pop rivets to firm the connection. 

You need to remove a spike? 

If a spike is installed too high or low, it should be removed so you can reinstall it correctly. Place a block of wood inside the gutters upper lip as shown and use a scrap shim or other thin wood to protect the gutter as you pry out the spike. 

Driving pop rivets 
  1. To drive a pop rivet, hold the two pieces tightly in position and drill a hole the required size.  Slip the rivet into the hole. 
  2. Fit the insert into the pop rivet gun, slide it through the rivet, and squeeze the handle firmly. The two pieces will be drawn together, and the rivet will flatten out. It may take a couple of squeezes to fully tighten the rivet. Remove and discard the insert. 

Installing Gutters 

Vinyl gutters are long-lasting, easy to work with and readily available. You can find all the vinyl components you need at a home center or large hardware store. Vinyl gutters are sturdy enough to lean a ladder against. They may fade in color over the years but are not difficult to paint.  

Aluminium gutters are best installed by pros who have equipment the produces long, seamless sections that scan the entire length of a house. They are rust –free but easily dented. 

The wider the gutters and downspouts, the less likely will same size and type. Size recommendations for gutters worked well, the three factors; the square footage of the roof that is served by the gutter, the pitch of the roof that is served by the gutter the pitch of the rood and the expected rainfall intensity in your area. Measure the largest roof sera that will be served by a gutter and downspout are ask a salesperson at the home center for advice on the correct gutter and downspout sizes. 

  1. On the fascia at the farthest point from the downspout , measure down from the drip cap1/2inch per 8 feet of gutter run or as recommend by the manufacture .snap a chalklike along the fascia and use a level to check the line level to check the down line for proper slope. Or use a line level to snap a line chalkline, measure down from it, and snap a guide lines.

2.Attach a drop outlet at the low end of the chalklike where you want the downspout to be Depending on the location of the downspout on the location if the table to the to simply add cap to the outer or you math need to attach a short length of downspout and a cap  

  1. Attach any outside corners aligning them with the chalkiness. Make sure they slope down toward the downspout.  Drill pilot holes and drives screws into framing members if possible. Attach inside corners in the same way.
  2. Attach the gutter backers to the fascia; for extra strength five long screws into rafter ends. Align the tops of the backers with sloped chalkine. Install three or four backers for every 10 feet of gutter. (With some gutter types you will install the brackets first onto the gutters and then attach the gutters.)
  3. Measure the length of a run (from end to end or form an end to a corner), taking into account how far a gutter will insert into a corner fitting.  Cut one of the gutters to length as needed and dry-fit all the gutter sections and the connectors.  Once you are sure of the length, disassemble the parts. Apply seal lubricant to the rubber seals of the joints.
  4. Slip the joints onto the gutters. Be sure to align them correctly so water will flow easily downhill.  You may choose to assemble an entire run on the ground or just assemble some of the parts, install them onto brackets, and assemble the rest of the parts in place against the fascia.
  5. Working with a helper, position a workable length of gutter onto the drop outlet, brackets, a perhaps a corner. Check the alignment, and then push the pieces together.
  6. Drive screws through each gutter connector and into the fascia using the screw hole provided.
  7. To cut a vinyl gutter, use a chop saw, a hand miter saw with miter box, or a hacksaw (shown). After cutting use a knife or putty knife to scrape away all the burrs so the cut end can seat fully into a fitting.
  8. Where a downspout needs to be offset from the end of a run, install a bracket near the end of the fascia. Cut a short section of gutter, attach an end cap, and attach to the drop outlet.
  9. To measure for the length of downspout that reaches to the house wall, attach a 45-degree downspout elbow to the drop outlet. Hold another 45-degree elbow against the house. Slip a downspout section onto the second elbow and mark where it needs to be cut so it fits into the first elbow.
  10. Cut the downspout section to fit and attach them to the fittings using lubricant or cement, as needed. Leave about ¼ inch at each joint for expansion.  Attach the downspout to the house near the elbow by slipping on a downspout bracket and driving two screws into siding or trim.
  11. The elbow at the bottom of the downspout should be about 6 inches above grade or at the right height so the downspout extender (next step) will be sloped at a rate of at least ½ inch per foot.
  12. At the bottom install a length of downspout resting on a plastic or concrete splash block. To further direct water away from the house, use a flexible extender.

Painting vinyl gutters 

To paint vinyl gutters first clean them with denatured alcohol and a stiff brush or an abrasive pad. Then apply 100-percent acrylic paint. Or apply alcohol-base primer (also known as white shellac), then paint.